Thursday, June 20, 2013

Hacking (fixing) Toki Tori for ICS+ Devices

A while back I picked up one of the excellent +Humble Bundle collections for Android (actually I think I've bought them all!) and included in the bundle was an interesting little platformer called Toki Tori.

I'd actually forgotten about this game completely until the latest +Humble Bundle Android release. I was browsing the new games using the app they provide when I saw it and thought it would be a great game for the kids. Unfortunately after installing it I found that it wouldn't work! A Google search revealed:

Which was a bit disappointing, especially considering these articles mention ICS and JellyBean has already been out for ages...

So, what to do? Well I assumed that there must be some Android platform related change that was causing the issue. Maybe this could be patched or worked around? First thing then is to have a look the logcat output when the game crashed:

E/AndroidRuntime(24470): FATAL EXCEPTION: main
E/AndroidRuntime(24470): java.lang.NoClassDefFoundError: android/view/ViewRoot
E/AndroidRuntime(24470):        at com.polarbit.fuse.MainTask.processTouchpadAsPointer(Native Method)
E/AndroidRuntime(24470):        at com.polarbit.fuse.MainTask.access$200(MainTask.java:42)
E/AndroidRuntime(24470):        at com.polarbit.fuse.MainTask$RenderSurface.surfaceCreated(MainTask.java:338)

A bit of searching revealed this:

It seems that the Toki Tori developers (or porters or whatever) might have been a bit naughty and referred to an internal framework class that changed between GB and ICS as per this quote from the ViewRoot 2.2 source:

The top of a view hierarchy, implementing the needed protocol between View and the WindowManager. This is for the most part an internal implementation detail of WindowManagerImpl

At this point I had two choices:
  • try and reverse engineer the native method processTouchpadAsPointer() and attempt to patch it
  • see what would happen if I simply didn't call it.
I opted for the easier route :) This wasn't an entirely sloth based decision: several obscure searches pointed in the direction of this function being linked to the Xperia Play, which in my case (I have a Samsung S3) wasn't a relevant platform.

When reverse engineering Android code I usually just use the excellent command line utilities: APKTool and Dex2Jar and then run the resulting jar through JD-GUI to have a look.

However on this occasion I stumbled upon the most excellent Virtuous Ten Studio which automates most of the drudgery out of the process. I'd really recommend it and suggest you go and buy a licence to support the devs if you can afford it! So following the stack trace we get to the surfaceCreated method of the RenderSurface class which looks like this in smali:

.method public surfaceCreated(Landroid/view/SurfaceHolder;)V
    .locals 4
    .parameter "holder"

    .prologue
    const/4 v3, 0x1

    .line 332
    iget-object v2, p0, Lcom/polarbit/fuse/MainTask$RenderSurface;->this$0:Lcom/polarbit/fuse/MainTask;

    iput-boolean v3, v2, Lcom/polarbit/fuse/MainTask;->mHasSurface:Z

    .line 334
    iget-object v2, p0, Lcom/polarbit/fuse/MainTask$RenderSurface;->this$0:Lcom/polarbit/fuse/MainTask;

    iget-object v2, v2, Lcom/polarbit/fuse/MainTask;->mContext:Landroid/app/Activity;

    invoke-virtual {v2}, Landroid/app/Activity;->getWindow()Landroid/view/Window;

    move-result-object v2

    invoke-virtual {v2}, Landroid/view/Window;->getDecorView()Landroid/view/View;

    move-result-object v2

    invoke-virtual {v2}, Landroid/view/View;->getRootView()Landroid/view/View;

    move-result-object v0

    .line 335
    .local v0, root:Landroid/view/View;
    if-eqz v0, :cond_0

    .line 336
    invoke-virtual {v0}, Landroid/view/View;->getParent()Landroid/view/ViewParent;

    move-result-object v1

    .line 337
    .local v1, viewRoot:Landroid/view/ViewParent;
    if-eqz v1, :cond_0

    .line 338
    iget-object v2, p0, Lcom/polarbit/fuse/MainTask$RenderSurface;->this$0:Lcom/polarbit/fuse/MainTask;

    iget v2, v2, Lcom/polarbit/fuse/MainTask;->mInstance:I

    #calls: Lcom/polarbit/fuse/MainTask;->processTouchpadAsPointer(ILandroid/view/ViewParent;Z)Z
    invoke-static {v2, v1, v3}, Lcom/polarbit/fuse/MainTask;->access$200(ILandroid/view/ViewParent;Z)Z

    move-result v2

    if-ne v2, v3, :cond_0

    .line 350
    .end local v1           #viewRoot:Landroid/view/ViewParent;
    :cond_0
    return-void
.end method

The interesting bit being this line of code:

if-eqz v0, :cond_0

Which is a basic null check before calling some additional code and finally the nasty method we want to get rid of. Hmmm looks like an interesting candidate and an elegant patch point. If we change the code to this:

if-nez v0, :cond_0

Then the condition is inverted and the relevant code skipped....
Making the change and using Virtuous Ten Studio to rebuild the APK was a 30 second operation, and guess what... it WORKS!

That is to say: I've played several levels and not only does the game now start, but it appears to work flawlessly.

Obviously I can't share the APK, but if the +Humble Bundle guys / gals want to get hold of me, I'd be happy to help them through this process. Alternatively, you could give it a go yourself.

Until next time, happy hacking!
-(e)

Monday, May 6, 2013

Make: Poor man's Minimig ARM Controller

In the last post I presented my findings on using a cheap ARM dev board as a replacement for a MiniMig ARM Controller. I've done some fairly extensive testing and it seems to work passably, so here are some instructions on how to build your own.

Firstly you are going need a board that hosts a AT91SAM7S256 chip and exposes the GPIO in a direct manner i.e. does not have any peripherals attached etc.

Specifically you need to make sure that:
  • PA4 - PA10
  • PA12 - PA15
  • PA24 - PA28
  • PA20
  • GND
  • 3.3V
  • nRST
Are available. If this is not the case, you could possibly alter the code to change pin mappings, but that is beyond the scope of this post.

Next you'll need to get hold of a 28 pin DIP socket, preferably the "tulip" kind:


In my case the dev board headers were available as headers with 2 rows of 10 pins:


So I used some crimp connectors and 20 way ribbon cable to connect these up.
Next you'll need to figure out the pin mappings between your dev. board and the pic socket.
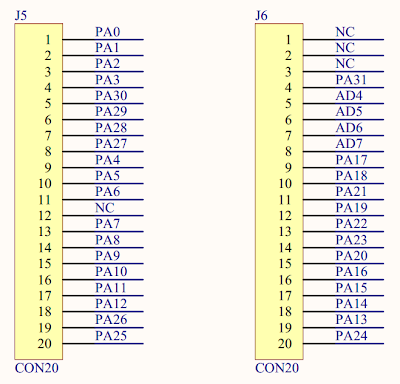
To start you need the schematic for your dev board, mine had this for the pinout info:


Then this must be mapped to the relevant pins on the PIC socket. I used the ARM controller schematics as a guide:


and the PIC mapping:


This should get you to something like this:


From there its just a matter of carefully mapping pin to pin with some wire.
I stripped and tinned the relevant wires in the ribbon cable, pushed them into the mapped holes in the DIP socket and then soldered them in.

The observant reader will notice that GND, 3.3V and nRST are not mapped to the dev board header.
There is another header on my board that provides GND and 3.3V and the JTAG header exposes nRST.

And that is all there is to it :)


HTH
-(e)

Friday, May 3, 2013

Prelude: Poor man's Minimig ARM Controller

I have 2 Minimigs both fitted with the replacement ARM Controller boards.
In a recent cock-up I nearly managed to destroy one of the ARM boards by breaking a pin off whilst hastily pulling it out of the Minimig.

Thanks to a $1 DIP socket I managed to save the controller by soldering the pin back onto the board.... and gently plugging the controller into the new socket:


Which thankfully worked pretty well. During this whole debacle I happened to have a proper look at the mcu on the board and saw that it was an AT91SAM7S256. I remembered that I had a cheap dev board with the same chip on it. The dev board cost me $25 when I bought it, as opposed to the near $100 price tag of the ARM Controller, so I began to wonder if it might serve as a cheap replacement.

After some very careful pin mapping and buzzing the dev board out, I came up with this:


And it works 100% (or seems to so far). Whilst the board I used does not seem to be for sale any more, there are alternatives available and even this board ($27 on eBay as of this post) :


(the bigger brother AT91SAM7S512) should be simple enough to wire up and port the code to (if even necessary).

All in all a fairly cost effective hack that also has the benefit of providing JTAG access for devs that wish to extend the ARM Controller firmware.

-(e)


Tuesday, February 12, 2013

Amiga A500 addon card "fixed"

Well it seems that I've managed to fix the card mentioned in my previous post.
The battery arrived from eBay, I cleaned up the traces (and repaired where necessary) and the miggy now boots with the card in place. I think its looking pretty darn good:

With some identification help from the friendly folk at AmiBay this seems to be an RTC and 1/2 or 1MB RAM upgrade board (seems that the RAM chips are 256KB, so possibly 1MB). Now I need a new FDD or equivalent to test this baby out as I can't get disks to load properly. No one ever said a retro-computing hobby was going to be cheap...

Wednesday, January 23, 2013

Resurrecting an Amiga 500

 A buddy of mine is emigrating and while going through all of his stuff came across his old Amiga 500 and Commodore 64 which he very graciously has donated to me! SCORE!

I love old computing hardware, already owning an Amiga A1200, Atari, ZX80 and various other bits and pieces so these two machines were a welcome addition to the fold.

The first thing to do was obviously to boot the machines up, so I started with the A500 and was greeted with the 10-short 1-long Blink Code of Death. A little Goolge-fu revealed that this indicates various severe issues, one pointing at a leaked battery and another at a chip RAM issue.

So I did the next logical thing and opened the miggy up. What I found was that (thankfully!) the main board was clean as new but an expansion card had a battery that had leaked (the miggy boots without this card, so another win):


It seems this might be an ActionReplay of some variety. Having a closer look at the problem revelead this:


Traces looking a bit dodgy and battery acid has leaked along the traces into the chip (RAM) socket.... oh dear... so I guess its time to clean it all up, but first a closer look at the damage:


Time to whip out the iron and get to work. After a fair bit of struggle (the battery contacts were well corroded and needed to be cleaned before I could de-solder them), the board now looks like this:


Looking not too bad in fact! The traces are intact, its just the lacquer on top that has gone. A really good clean with some isopropyl alcohol and a pretty thorough test with the multimeter indicates that all is OK. Unfortunately the other battery contact point was not so good:


Bit of missing trace there, but easily repairable. So off to eBay to get another battery and to the local electronic supplier to get another socket (why is it that you always have every other chip socket but the one you need!!!).

The battery is in transit and should arrive in a week or two (the joy of living at the bottom of Africa) and the socket I'll pick up this weekend. Hopefully the actual RAM chip is okay and once I've sorted out these two issues the card will work again.

I'll update with info as it goes. Now I have to find a suitable video-out option for the A500 as B&W composite is just not doing it for me, the best looking option is a bit expensive though...